Deploying to a Device
Testing your app in the browser withionic serveor with an emulator is fast, easy and convenient when your app is in development, but eventually you’re going to have to test on a device. Not only is it the only way to accurately test how your app will behave and perform, manyIonic Nativeplugins will only work when they are run on actual hardware.
Android Devices
Deploying to an Android device is a fairly straightforward process. If you have a working Android development environment, you’re ready to go.
Requirements
- Android Studio
- Updated Android SDK tools, platform and component dependencies. Available through Android Studio’s SDK Manager
Running Your App
To run your app, all you have to do is enable USB debugging and Developer Mode on your Android device, then runionic run android --devicefrom the command line.
This will produce a debug build of your app, both in terms of Android and Ionic’s code
Enabling USB debugging and Developer Mode can vary between devices, but is easy to look up with a Google search. You can also check outEnabling On-device Developer Optionsin the Android docs.
Production Builds
To run or build your app for production, run
ionic run android --prod --release

# or

ionic build android --prod --release
This will minify your app’s code as Ionic’s source and also remove any debugging capabilities from the APK. This is generally used when deploying an app to the Google Play store.
iOS Devices
Unlike Android, iOS developers need to generate a provisioning profile to code sign their apps for testing. The good news is that, as of iOS9, you can develop and test your apps on your iOS device without a paid Apple Developer account. This is particularly great for developers who want to try out mobile development with Ionic, since it saves the cost but still provides a lot of the features of having a full Apple Developer account. For a full breakdown of the features included, check outApple’s docs.
Requirements
- Xcode 7 or higher
- iOS 9
- A free Apple ID or paid Apple Developer account
Creating a Provisioning Profile
To start, you’ll need to set up a provisioning profile to code sign your apps.
Using an Apple ID
- Open Xode preferences (Xcode > Preferences…)
- Click the ‘Accounts’ tab
- Login with your Apple ID (+ > Add Apple ID…)
Once you’ve successfully logged in, a new ‘Personal Team’ with the role ‘Free’ will appear beneath your Apple ID.

Using an Apple Developer Account
Creating a provisioning profile with a paid Apple Developer account is a little bit more involved. For full instructions, check outLaunching Your App on Devicesin the Apple Developer docs.
Running Your App
- Run a production build of your app with
ionic build ios --prod - Open the
.xcodeprojfile inplatforms/ios/in Xcode - Connect your phone via USB and select it as the run target
- Click the play button in Xcode to try to run your app
Oops, code signing error! No problem.
Code Signing Your App
Next, you’ll need to code sign your app. How you do this will depend on if you are running Xcode 8 or an earlier version.
Xcode 7 and Earlier
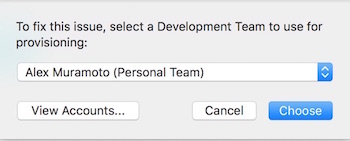
If you are running Xcode 7 or earlier, you’ll get a code signing error that looks like this when you try to run the app:
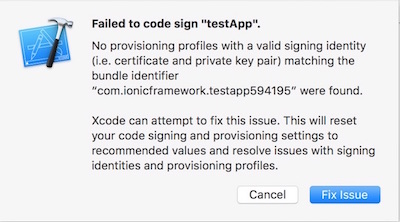
Click the ‘Fix Issue’ button, then select your ‘Personal Team’ profile.
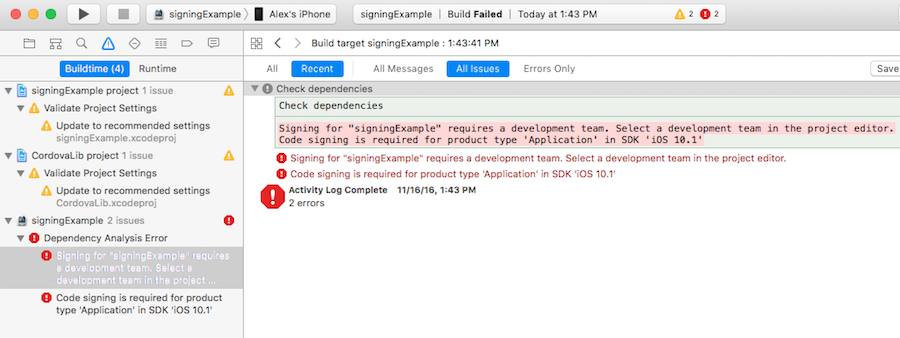
Xcode 8
If you are running Xcode 8, the code signing error will appear as a buildtime error, rather than as a pop-up:
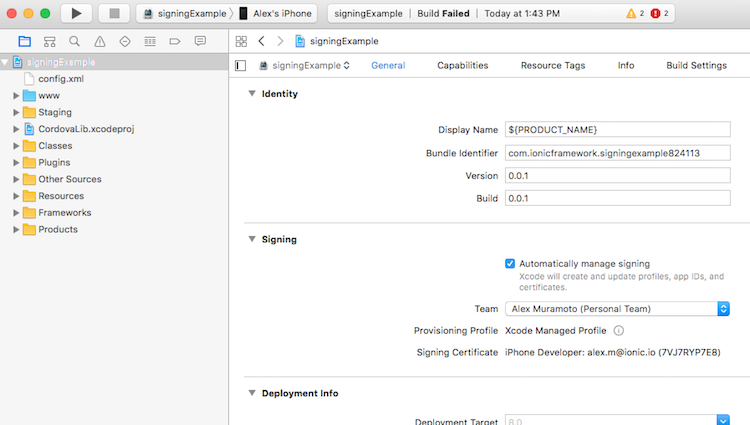
To select the certificate to sign your app with, do the following:
- Go to the ‘Project Editor’ by clicking the name or your project in the ‘Project Navigator’
- Select the ‘General’ section
- Select the team associate with your signing certificate from the ‘Team’ dropdown in the ‘Signing’ section
Trusting the Certificate
Once you’ve code signed your app, you should get a launch error that looks like this. On Xcode 7 and below you’ll see this automatically. On Xcode 8 it will appear the next time you try to run the app:
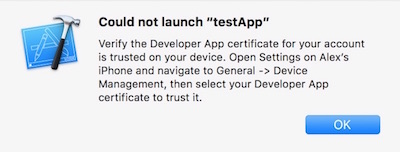
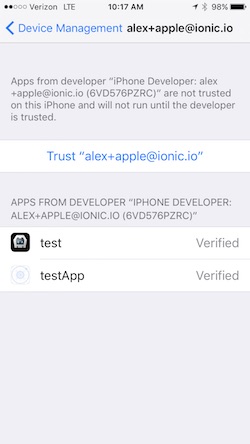
To get past this, we have to tell our iOS device to trust the certificate we code signed our app with:
- Open the ‘Settings’ app on your iOS device
- Go to ‘General > Device Management’. You’ll see the email address associated with the Apple ID or Apple Developer account you used to code sign your app.
- Tap the email address
- Tap ‘Trust < your_email > ’:
Now, go back to Xcode and hit that play button or runionic run ios --devicefrom the command line to install and launch your app on your iOS device.